Showing posts with label Wink of Stella. Show all posts

Wednesday, 11 October 2023

Week 24 2023-24 Colour Creations Blog-Hop - Fresh Freesia


Hello and welcome to week 24 of the colour creations blog-hop. This week our feature colour is Fresh Freesia. A beautiful pale lilac colour and I love it. I have chosen to also feature the lovely Deckled Circles from the mini catalogue as well. As I think the to go together really well.

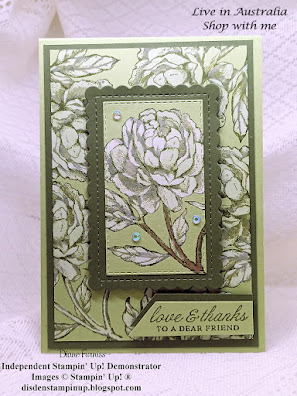
I love rocker cards and I thought this would be a lovely colour to do this with. I started with a Fresh Freesia card base, that I cut out using the largest deckled circles dies and then added a Night of Navy layer followed by a DSP layer from the  Delightfully Eclectic pack. I folded the first circle in half and then cut the other 2 layers in half. I then added 3 more circles for the topper in Fresh Freesia, Night of Navy and Basic White. Using the Happy Birthday die from the Wanted to Say set and the flowers made from the Paper Florist set. to decorate the front of my card.

Finishing off the centre of the flowers with Iridescent gems and some Wink of Stella.


My insert was layered with Night of Navy and Basic White and stamped with a message from the Pansy Patch stamp set. All of these colours go together so well I love the way it turned out. All items used in this project are from the 2023-24 Annual Catalogue and the Deckled Circles are from the 2023 Mini Catalogue. I really hope they will carry these circles over into the next Annual Catalogue I think as more people see how many dies there are and how many lovely project they can make they will want them.

If you would like to know more about these prodcuts used or you would like to purchase them please feel free to contact me via email, PM or phone. So that I might help you.

To catch up with the next person on the Hop please follow the link button below to-: Rachel Palmieri


 If the next button link is not working or you’d like to see the entire list of participants go to Catherine Proctor's Blog from Here

Thank you for taking the time to view my Blog.
Hugs Diane xx


Wednesday, 22 March 2023

Week 45 Colour Creations Blog-Hop - Shaded Spruce


Hello and welcome to the Colour Creations Blog-Hop, this is week 45 of 50 so we are getting close to the end of the hop. This week our colour is called Shaded Spruce, a lovely green that is part of the Regals Collection. in the collection you will find matching Card, Ink and Markers as well as Blends light and Dark. I have chosen an older bundle to share with you all today. This bundle can be found on page 73 of the Annual Stampin' Up! Catalogue.\, and is called Forever Fern. 

I started with a Basic White card base and added the Shaded Spruce layer, I then added a Mint Macaron layer that I stamped using Shaded Spruce ink stamped off once. I then stamped the leaves in Shaded Spruce, Mint Macaron & Old Olive and cut them out using the dies. I finished off with a little bit of Silver Leaves. I then added the sentiment layers and stamped in Shaded Spruce. I added a few 2021-2023 Opal Rounds and splashed around the Wink of Stella to add a little sparkle.

I layered the inside of my card using Shaded Spruce and Basic White.  I stamped the Leaves in Shaded Spruce but I didn't add a sentiment message to the inside of the card, as the words on the front can be used for many occasions.

A simple card with plenty of uses.

All the items used in this project can be found in the 2022-2023 Annual Catalogue. If you would like to know more about this project or the products used please feel free to contact me via Email, Phone or PM.

To catch up with the next person on the Hop please follow the link button below to-: Theresa Gerrard

 If the next button link is not working or you’d like to see the entire list of participants go to Catherine Proctor's Blog from Here

Thank you for taking the time to view my Blog.
Hugs Diane xx


Wednesday, 14 December 2022

Week 33 Colour Creations Blog-Hop - Old Olive


Hello and welcome to the last Colour Creations Blog-Hop for 2022, we will all be back in the New Year to finish off the colour pallet. Starting up again on the 4th January 2023. But until then here we are featuring Old Olive. As you would all know by now Green is my Favourite colour so I really didn't have any trouble with is one. I decided I would use the lovely Grassy Grove Stamp Set, that you will find on page 84 of the Annual Catalogue. I started with a Basic White card base and added a Old Olive layer and then I stamped my scene on another piece of Basic White.

I started with the sun and the Blending Brushes using Daffodil Delight and then some Balmy Blue for the sky area. I then used some torn paper and the Blending Brushes to form the hills using Old Olive ink pad. Once I was happy with them I then added a little extra to give a deeper green. I stamped the tree in the same colour and using a small brush I added a little Flirty Flamingo behind the trees so that it looked like the sun shining through them. Finishing off the front with the grassy stamp and the Dear that I stamped in Soft suede. To give a bit of sparkle to the card I used my Wink of Stella on the trees as well. 

Keeping my insert simple I layered some more Basic White onto Old Olive and just stamped some more trees in the bottom corner. All in other stamping was done using Momento Ink.  All the items used in this project can be found in the 2022-2023 Annual Catalogue. If you would like to know more about this technique or the items used, please feel free to contact me via email, PM or phone.

To catch up with the next person on the Hop please follow the link button below to-:Catherine Proctor


  If the next button link is not working or you’d like to see the entire list of participants go to Catherine Proctor's Blog from Here

Thank you for taking the time to view my Blog.
Hugs Diane xx


Wednesday, 2 February 2022

Week 34 Colour Creations Blog-Hop - Pear Pizazz


Hello everyone and welcome to week 34 of the colour creations Blog-Hop. Well this week we are featuring the colour Pear Pizzazz, it's a really lovely green colour (I know I'm a bit biassed as green is my favourite colour).  But really it is a lovely green and I have coupled it with another of the greens. Mossy Meadow.  I have seen the Whitewash technique done a few different ways and I thought I want to give this a go. So here is my version of this technique.

So starting with a pear Pizzazz card base I then added a Mossy Meadow layer. I then cut a 2nd layer in Pear Pizzazz and stamped it using the Prized Peony stamp set and Mossy Meadow Ink. I then cut another layer using one of the Scalloped Contour dies and then using the Stitched Rectangles I cut another Pear Pizzazz layer that once again I stamped from the Prized Peony stamp set.
I then started to colour the stamped images using the White Craft ink pad that I squeezed onto one of my stamp block so the the ink was covering it. Using the Blender Pens that come in a pack of 3 I picked up some of the ink and started to colour in the flower petals. I did this on both stamped images. on the top image I coloured the branch using the Bronze blends pen. I that stamped my sentiment and mounted this onto another layer so that the 2 greens were together even there. I attached the sentiment and the smaller layers to the front of the card using dimensionals. 
Finishing off the front of the card with the beautiful Iridescent Rhinestones and a little Wink of Stella. My insert I layered the Mossy Meadow with Basic White. I stamped another of the Prized Peony flowers in the bottom right-hand corner and left the rest of it clear without a sentiment.

 
I was really happy with the effect and I have since made 2 more cards using this technique in different colours. Everything used in this project except the Rhinestones can be found in the Annual 2021-2022 Catalogue. The Iridescent Rhinestone can be found in the Jan-June 2022 Mini Catalogue. If you would like to know more about this technique or would like to purchase any or all of these product please feel free to give me a call, email or PM so that I can help you with your purchase.
Thank you for taking the time to view my Blog.
Hugs Diane xxx
 
 To catch then next person on the Hop please follow the link to-:  Rosa Leyden  Here-:


If the next button link is not working or you’d like to see the entire list of participants go to Catherine Proctor's Blog from Here-

Thank you again Hugs Diane xx


Wednesday, 26 January 2022

Week 33 colour Creations Blog-Hop - Pacific Point

Hello Everyone and Welcome to week 33 of the Art with Heart Team Australia Colour Creations Blog-Hop. This week we are featuring the colour Pacific Point. This is a colour from the Brights Collections and is a beautiful rich blue.  I have chosen to feature this colour using the Friends are like Seashells Bundle on page 27 of the Annual Catalogue. I must admit I purchased this set awhile ago but never got around to using it. I also have used a Sale-A-Bration item Simply Marbleous DSP. So I started with a Basic White card base and added my Pacific Point layer and the Simply Marbleous DSP in the Balmy Blue. I then cut out the large seashell die and stamped my images onto the cut out using Pacific Point, Misty Moonlight, Old Olive and Calypso Coral. I then used my blending brushes to colour the leafy area with Soft Sea Foam. After that I used the Embossing folder to add texture to the die cut image, it really pops. Then I mounted this onto the front of my card using dimensionals. I added my sentiment and so star fish, to finish off the front I used Wink of Stella on the seashells to give that wet look.


 My inside of the that is also layered with Pacific Point and Basic White I stamped in the feature colour and added a couple of reeds and shells to the bottom left-hand corner. 

All the items for this project can be found in the 2021-2022 Annual Catalogue, with the exception of the Sale-A-Bration DSP which is only available until the 28th February 2022 for FREE with a $90AU order. If you would like to purchase any or all of the items used in this project please feel free to give me a Call, Email or PM so that I can help you with your purchase. Thank you for taking the time to view my Blog.

To catch then next person on the Hop please follow the link to-: Christine Blain   Here-:


If the next button link is not working or you’d like to see the entire list of participants go to Catherine Proctor's Blog from Here-

Thank you again Hugs Diane xx

Wednesday, 10 March 2021

Week 39 - Colour Creations Showcase - Purple Posy


Hello and welcome to week 39 of the Colour Creations Showocase. This week we are showcasing the beautiful 2019-2021 Incolor called Purple Posy. It's a really lovely soft purple and I will be sad to see it retired in just a few months time. I decided I would team this up with the next shade of purple in our colour range Highland Heather, as I think they go together really well.


I started my project using a Highland Heather card base and layered with a Purple Posy and True love DSP I then added the Scalloped linen ribbon in Purple Posy as well. I then stamped my flowers from the Forever & Always bundle and using the blends in both light and dark coloured the flowers and leaves. before cutting them out. I mounted them onto the card front using dimensionals and added a touch of Wink of Stella to the flowers. I then cut out the word Love in Highland Heather and Purple Posy and mounted them together on the front of the card I stamped the work YOU using Highland Heather and added some Pastel Pearls to finish off the front of the card.


My insert is  comprised of a Purple Posy layer and a white layer that I stamped the words FOREVER & on Highland Heather I then cut out the words Always and glued them together to place on the inside I also stamped, coloured and cut out the smaller flower to glue inside. I just thought the inside of this card needed to be eye popping as well as the front. All the items used in the project can be found in the Annual 2020-2021 Catalogue or the 2021 Mini Catalogue. If you would like to purchase any of all of these products please give me a call, email or PM so that I might help you with your purchase.
To catch all the other beautiful Purple Posy Projects in this weeks Colour Creation Showcase please head over to Catherine's Page here-:
Thank you for taking the time to read my blog, Hugs Diane xxx

Items used in this project-:

150887          Purple Posy A4 Card Stock
154896          Purple Posy Blends Light & Dark Combo
147010          Highland Heather A4 Card Stock
147103          Highland Heather Ink Pad
154892          Old Olive Blends Light & Dark Combo
156200          Forever & Always Bundle
149706          Purple Posy Scalloped Linen Ribbon
154281          True Love DSP
154571          Pastel Pearls
141897          Wink of Stella

Wednesday, 12 August 2020

Week 11 - Colour Creations Showcase - Coastal Cabana

Week 11 - Coastal Cabana,

https://whatcathymade.com.au/?p=5496 

Hello, and welcome to week 11 of the Art with Heart Colour Creations Showcase. Coastal Cabana a colour from the Brights Collection and a very pretty turquoise blue colour.
For this weeks project I used the lovely Tasteful Touches Stamp set. I started with a Coastal Cabana card base and then added a Basic Black layer. 
I then stamped the leafy sprig using Coastal Cabana ink onto the bottom of a Whisper White layer of card and the words "You are so Special" between them in Memento. I then layered this onto my Black layer on the front of the card.
 I then proceeded to add another Basic Black layer to the front of the card followed with Whisper White, I once again stamped the leafy sprig this time in memento. I then stamped the flower using the Coastal Cabana ink 5 times and fussy cut out 3 and the other 2 I cut down to make a 3D layer for the flowers on the front of the card. I attached these over the black sprig using Dimensionals, I finished then front of the card off with a touch of Wink of Stella.
For my insert I once again layered using Basic Black and then Whisper White, I stamped my sentiment and another leafy Spring in Memento, before gluing the last of the flowers that I had cut out. 
 This is a very simple card using lots of layers to the effect and only one stamp set and to ink colours. All the items used in this project can be found in the 2020 - 2021 annual catalogue, if you would like to purchase any or all of these product please give me a call, email or PM me so that I can help you with your purchase. If you prefer to shop online head over to the Stampin' Up! website to place your order when asked for your demonstrator please place my name "DIANE FURNISS" in the space provided. Thank you.
To catch all the other lovely project using Coastal Cabana go to Catherine's Page Here-:
Thanks and bye for now......Hugs Diane

Items used in this project.
131302          Coastal Cabana A4 Card
121688          Basic Black A4 Card
106549          Whisper White A4 Card
147097          Coastal Cabana Ink Pad
132708          Memento Ink Pad
141897          Wink of Stella
104430          Dimensionals
152562          Tasteful Touches Stamp Set


Sunday, 6 October 2019

Twist and Fold Card using Stampin' Up! Products

Hi everyone,
Here is the YOUTUBE Video on the Twist and Turn card.
The video was done using the Magnolia Lane Bundle and Paper.
I hope you enjoy, please leave me a thumbs up or down if you liked this card.
Hugs Diane xxx


P.S. If you enjoyed this YOUTUBE video why not join my Facebook group for the written tutorial it's "Dis Den for Stamping Crafting and Tutorials"


Tuesday, 9 October 2018

Colour Creations - Garden Green

http://whatcathymade.com.au/awh-colour-creations-blog-hop-week-19-garden-green/

Hi Everyone, We are at the G's with our colours this week, and the colour is......... Garden Green.
This is not a hard colour for me as green is my favourite colour. This week I decided I would do a novelty card for a change. So sorting through my stamps sets and chose "Bubbles and Bubbly"


I stamped the lady in the bath onto whisper white and on Garden Green and the feet of the bath onto some silver foil sheet I then cut them all out by have and added the green bath and silver feet onto the white stamped image. I used my white gel pen to give the bath some dimension. I then stamped a small piece of copy paper for the shower curtain and folded it so that it was on one side of the bath. I also cut a very thin slither of silver foil sheet to thread through the curtain to give the appearance of a rod.  I then thought if I coloured around the edge of the card to give the look of being wet it would add the hot bathroom look.


I added a shelf for the candles and then placed my image on dimensionals and mounted it to the front of the card and wink of Stella to the Bubbles in the bath.  My little mat was cut from a piece of card and afterward screwed up and flatten out to look like the bathroom mat next to my bath.......lol


I then stamped my insert and mounted it to the inside of my card. Just plain and simple but says it all.
If you like this card and would like to purchased any or all of the products used in this project please give me a call so that I can help you. All Items are in the 2018-2019 Annual Catalogue.

To see more Garden Green Blogs please go to Catherine's Page Here.

Buy for Now, Hugs Diane xx

Saturday, 16 June 2018

Elegant Butterfly Card

Main Card                 8 ¼ x 5 7/8 Inches Scored at 4 1/8 inches on the long side.
Card Mat                   5 5/8 x 3 7/8 Inches
                   White      5 3/8 x 3 5/8 inches
Panel                          4 ¼ x 2 inches
Panel D.S.P.              4 1/8 x 1 7/8 inches
Tag Mat                     2 ½ x 1 ¼ inches
       White                  2 3/8 x 1 1/8 inches
Springtime Impressions Butterfly Die Cut
3 Rhinestones
Score card at 4 1/8 inches on the long side.
Glue the Mat to the card front and then the white mat on top.
Glue the D.S.P. to the Mat panel and then to the card front.
Stamp your sentiment on the white tag and mat onto the Mat tag.
Use foam pads to attach to the front of the card.
Place foam pads to the back of the butterfly and attach to the card front.
Place rhinestone down the spine of the butterfly.
Tutorial and all measurements by Diane Furniss
16th June 2018