Wednesday 30 March 2022

Week 42 Colour Creations Blog-Hop Shaded Spruce


Hello and Welcome to week 42 of the Colour Creations Blog-Hop. This week we have Shaded Spruce as our colour. This is a very dark rich green colour and part of the Regals Collection. You can find Card Stock, Ink Pad, Refil and Blends in this colour as well as DSP. Being as green is my favourite colour I didn't have much trouble coming up with some thing. Unsure we you call this design, but I have seen it done several times and thought I would like to have a try. So here is my version of the slanted fronted card.

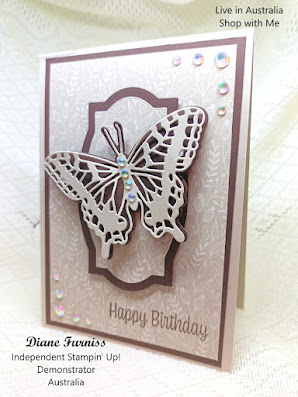
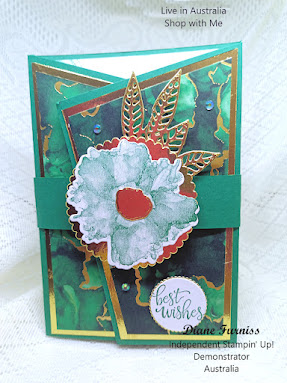
Using Shaded Spruce as my base card I added a Gold Foil Layer and then DSP from the Expressions in Ink collection. I then made a Belly Band and used the Layering Circles to cut out a large Scalloped Circle. I stamped the large Flower image from the Artisically Inked Bundle and them cut it out with the dies. mounting this on to the gold Foil Circle I added a few of the leave to finish off the belly Band. I place my sentiment onto a piece of Basic White card with more Gold Foil behind it. I added a few or the Iridescent Rhinestones to finish off the front of the card.

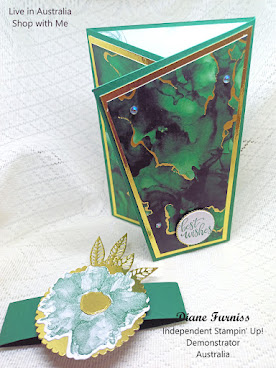
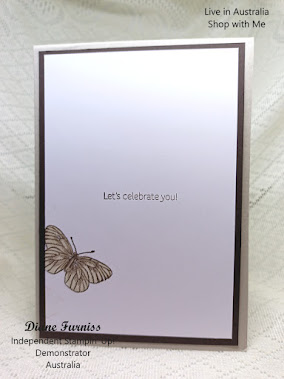
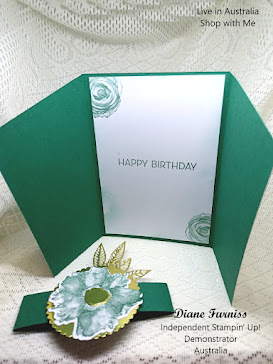
I can't believe how easy this card is to make and it looks so effective cut on these angles. I think I will have to do a tutorial on this one. As always my insert is very plain (I prefer them that way).


Stamping in Shaded Spruce and then using the blending brushes to soften the edges. All the items used in this project can be found in the Annual 2021-2022 Catalogue. If you would like more information about this project or you would like to purchase the supplies used please feel free to give me a Call, email or PM, so that I might help you. 

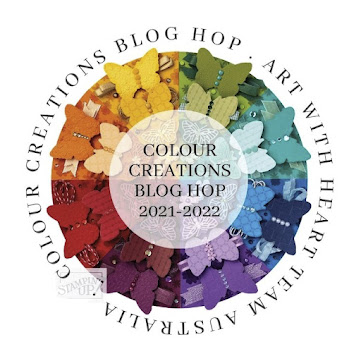
You can catch the next person in the Blog-Hop-: Rosa Leyden  Here.


If the next button link is not working or you’d like to see the entire list of participants go to Catherine Proctor's Blog from Here

Thank you for taking the time to view my Blog.  
Hugs Diane xxx


Sunday 27 March 2022

#113 (22) Gift Wallet Card

A Great little project, that is great for so many occasions. This Wallet will please so many. I first made these for Christmas for my Good Children who are 18 & 17 and they loved them. If you would like the written tutorial for this project please head over to my Facebook Group Page-: Di's Den for stamping Crafting and Tutorials.

We all look forward to seeing you there.

Hugs Diane xx

Wednesday 23 March 2022

Week 41 Colour Creations Blog-Hop Sahara Sand


Hello Everyone, and welcome to week 41 of the colour creations block hop. We are almost at the end now, and it's been a great ride. This week our colour is Sahara Sand and as the name implies it's a light sandy colour. Sahara Sand is one of the Neutrals Colour range and you can find Card Stock, Ink Pad & Refills in this colour along with the DSP colour range. I did find it a little hard to design a card using this colour as it's not one of the colours that I reach for.

 
But here it is. I started with a card base using Sahara Sand and then added a layer in Early Espresso. The DSP that I used comes from the Tidings of Christmas range found in the Annual Catalogue. Even thought it's classed as a Christmas paper it doesn't have a Christmas theme to this DSP.  I then used the layering dies from the Hippo Happiness bundle to the next 2 layers one in Early Espresso and the other using the DSP again. I then cut out the butterfly from the Butterfly Brilliance Bundle. First the solid butterfly and then the filigree one. again in Early Espresso and Sahara Sand. I then curved the wings on both and added dimensional between the layers and then back of the butterflies.
 
 
Before attaching them to the front of the card. I stamped my Happy Birthday directly onto the DSP, using the Stamparatus so the I could stamp it several times. I finished off the front of the card with the Iridescent Rhinestones.
 
As always my insert is very plain. I layers Early Espresso and Basic white together and just stamped a short and sweet message on the inside along with one of the butterflies from the same bundle. A pretty and elegant card, but unsure who will be getting this one yet. All the items used in this project can be found in the 2021-2022 Annual Catalogue. If you would like any or all of these product please feel free to give me a Call, email or PM so that I can help you with your purchase.

Thank you for taking the time to view my Blog. You can catch up with-:  Theresa Gerrard Here for the next Blog Hopper in this group.


If the next button link is not working or you’d like to see the entire list of participants go to Catherine Proctor's Blog from Here-

Hugs Diane xxx


Sunday 20 March 2022

#112 (22) Half Star Shape Card Using Stamping up Products.

Hi Everyone, here we are with another project for February 2022. This one is called a "Half Star Card" a little different and yet so easy to make. If you would like the written tutorial for this project please head over to my Facebook Group Page-: Di's Den for Stamping Crafting and Tutorials.

we all look forward to seeing you there and it's FREE.

Hugs Diane xx

Wednesday 16 March 2022

Week 40 Colour Creations Blog-Hop Rich Razzleberry


Hi Everyone and welcome to week 40 of the Colour Creations Blog-Hop. This week we are featuring Rich Razzleberry  not one of my favourite colours, but here is goes. I decided, I wanted to use a bundle that I haven't used in awhile. So I pulled out and dusted off "Dressed to Impress" I really had no idea what I was going to do with it, so this was my challenge. I started with a Rich Razzleberry card base and my only layer is Basic white. I stamped my sentiment using Memento ink in the left top corner. then I decided I would add small strips of card in Petal Pink, Real Red and Rich Razzleberry. I thought I would add the lipstick onto these of I stamped them and coloured them using the matching blends. I angled these onto my strips gluing them flat.
I placed these strips onto the white card and when I was happy with the position I then stamped the corresponding lipstick smudge in front of the strip. I then added this strips on dimensionals. To finish off the front of the card I coloured 3 Basic Pearls with Rich Razzleberry and  added them to the bottom right-hand corner.

My insert again was just a piece of Basic white card. I added another lipstick and smudge at the bottom in Rich Razzleberry and stamped a sentiment. I was happy with the way this card turned out and glad that I set myself a challenge. All the Items used in this project can be found in the 2021-2022 Annual Catalogue. If you would like to know more about these product or you would to purchase them please feel free to give me a Call, Email or PM so that I can help you.
Thank you for taking the time to view my blog.
 
 To catch then next person on the Hop please follow the link to-:  Kate Morgan   Here


If the next button link is not working or you’d like to see the entire list of participants go to Catherine Proctor's Blog from Here-

Hugs Diane xxx

Sunday 13 March 2022

#111 (22) Triple Layer Card 1

Hi Everyone, Welcome to my Sunday YOUTUBE Video. This week we are doing a card that was inspired by Dawn Griffiths and Iced Images. If you would like the written tutorial for this project please head over to my Facebook Group Page-: Di's Den for Stamping Crafting and Tutorials. Here you can download the tutorial for free. I only ask that you join my group.

We all look forward to seeing you there.

Hugs Diane xx

Wednesday 9 March 2022

Week 39 Colour Creations Blog - Hop Real Red


Hi and welcome to week 39 of the Art with Heart Team's Colour Creation Blog-Hop. We are really getting to the pointy end of the colours now. This week we have Real Red and though it's a lovely colour, I did struggle to come up this something for this card.  Real Red is one of the Regals Collection of colours and you can get Card stock, Classic Ink Pad, Refill and Blends Combo Pack in this colour along with this colour being featured in some of the DSP.
I have chosen to feature this colour using the Hello Ladybug Bundle from the  Jan-June 2022 Mini Catalogue. I really love this bundle and have used it a lot.
 

I started my card with a Real Red card base and added a Basic White layer and then a DSP layer from the Simply Elegant 12 x 12 pack I then cut out a scalloped layer in Basic White from the Scalloped Contours dies. Using Real Red ink I stamped the flowers from the Hello Ladybug stamp set through the middle on and angle. I first stamped off so as to lighten the colour a little. Once I was happy with this I then stamped my sentiment. I glued this to the front of my card on an angle. on another piece of Basic White card I stamped the large leaf and fussy cut them out. I place one at the top and one at the bottom front as seen in the photo. I then used the punch from the Bundle (Ladybug Builder Punch) and some Basic Black to cut out the body of the bugs and some Real Red to cut out the wings. Stamping the wing using Memento Black ink for the stops. I added Dimensionals to the back of the wings and also the back of the bug, then attached them on top of the leave. I finished off the front of the card using the Beautiful Iridescent Rhinestones in the middle of each flower.
 

The inside of my card is just a Basic White layers that I stamped my message on and glued to the inside of the card. I then stamped the large leaf and flower from the bundle and fussy cut them out and glued them also to the inside of the card. plain and yet effective. All the items used in this project can be found in the 2021-2022 Annual Catalogue and the Jan-June 2022 Mini Catalogue. If you would like more information about these or other product please feel free to give me a call, email or PM, so that I can help you.

Thank you for taking the time to read my Blog.

To catch then next person on the Hop please follow the link to-: Catherine Proctor   Here


If the next button link is not working or you’d like to see the entire list of participants go to Catherine Proctor's Blog from Here-

Hugs Diane xxx


Sunday 6 March 2022

#110 (22) Shadow Box Version 2

Hi Everyone, Here is a Shadow Box Card for you all to try. If you would like to written tutorial for this project please head over to my Facebook Group page-: Di's Den for Stamping Crafting and Tutorials. A big Thank you goes out Frances McFaul for her help with the tutorial.
We look forward to seeing you there.
Hugs Diane xx


Wednesday 2 March 2022

Week 38 Colour Creations Blog-Hop - Pumpkin Pie


Hi and welcome to week 38 of the colour creations Blog-Hop. This week our colour is Pumpkin Pie, a lovely Orange colour and my 2nd favourite colour. This colour is part of the Regals collection and also has Card Stock, Classic ink Pad, Refill and Blends that all match. You will also find some beautiful Designer Series Paper that co-ordinates, called Flowering Fields. This can be found in the 2022 Mini Catalogue. This is what I have used for my projects for this week.


So this card was inspired by Linda Heller, but I loved the simplicity of the design and this is my version. I started with a Pumpkin Pie card base and added a Basic Black layer, I then added my DSP that I cut into 2 pieces turning the middle one over to reveal the other side. I layered this onto my Basic Black layer. I then cut a strip of Vellum and flag tailed the end. I attached this to the front of the card using glue dots.

With the Vellum in place I than made up one of the tulip flowers from the Flowering Tulips Bundle and attached this to the Vellum. I stamped my sentiment tag from the same bundle and cut it out using the layering circles, finishing off the front with some Champagne Rhinestones..


Keeping my insert simple I just layered Basic Black and Basic White together and stamped my message. I thought that the outside of the card said everything I wanted to say. No need for any more.
The flowering Tulips Bundle and DSP can be found in the 2022 Mini Catalogue, all the card stock, ink and rhinestones are in the 2021-2022  Annual Catalogue. If you would like to know more about these product, or would like to purchase them please feel free to either PM, Call or Email me so that I can help you.
Thank you for taking the time to read my Blog.

To catch then next person on the Hop please follow the link to-: Theresa Gerrard   Here
 

If the next button link is not working or you’d like to see the entire list of participants go to Catherine Proctor's Blog from Here-

Hugs Diane xxx