Showing posts with label Basic Pearls. Show all posts

Wednesday, 30 August 2023

Week 18 2023-24 Colour Creations Blog-Hop - Coastal Cabana


Hello and Welcome to week 18 of the colour creations Blog-Hop. The colour that we are featuring today is called Coastal Cabana. A Beautiful Greeny-Blue. I really did wonder what shall I do with this colour and then I thought I will use the "It's a Science" Stamp set. So here is my take on this set.

I started my project with a Coastal Cabana Card base and using my Dauber and Coastal Cabana ink pad I edged the main card. I then did the same on my Basic White card. I also used my refill Bottle to drop spots of ink onto the card. I then stamped the atoms all around. I did the same with my Flagged Coastal Cabana piece of card. Using the Circles from the Reach from the Stars Bundle for the feature part of the card front. I then stamped the Microscope and hand cut this out after colouring it.

I think I went a little overboard with my basic pearls and iridescent gems that I coloured using Lost Lagoon. But I think it needed them in the end. I also dropped ink spots on the insert of my card along the using the dauber around the edges of the card and insert. I stamped the clip board for my saying. I think this came up pretty well considering that fact that I didn't know what I was doing. Making it up as I went along.

All the items used in this project can be found in the 2023-24 Stampin' Up! Annual Catalogue. If you would like to know more about this product or would like to purchase them please feel free to contact me via Phone, Email or PM.

To catch up with the next person on the Hop please follow the link button below to-: Kate Morgan

If the next button link is not working or you’d like to see the entire list of participants go to Catherine Proctor's Blog from Here

Thank you for taking the time to view my Blog.
Hugs Diane xx

Wednesday, 19 July 2023

Week 12 2023-24 Colour Creations Blog-Hop - Berry Burst


Hello and welcome to week 12 of the colour creations Blog-Hop. This week our feature colour is Berry Burst. I love this colour and am so glad that it has returned. I decided that I wanted to do another of the Fancy Fold cards that everyone knows I love doing. So I have chosen the Flip Flap card and I really love how it pops in Berry Burst.

I actually started my card with a Bubble Bath card base and then stamped it using Berry Burst ink and the Share a Milkshake bundle. The little hearts look really pretty against the Bubble Bath. I Then use a Berry Burst layer before the next layer of Bubble Bath. (Stamped again). Adding the Bright and Beautiful DSP to the flappers and behind really looks bright and cheery. I then stamped the Sundae's and spoons. 


I put the same sundae's and spoons on the inside of the flappers as well, but unlike the front I didn't add some Basic Pearls that I coloured to look like cherries. This is such a lovely interactive card I recon you could make this for lots of occasions.


As this is a 7x5inch card and it is mounted onto a proper card base I wanted to show off the lovely colour combo so I gave larger that normal borders. Finishing off the inside with more sundae's and spoons. All the items used in this project can be found in the 2023-24 Annual Catalogue. If you would like to know more about this design or the products used please feel free to contact me via email, PM or phone so that I can help you with your purchase.

To catch up with the next person on the Hop please follow the link button below to-: Christine Blain


If the next button link is not working or you’d like to see the entire list of participants go to Catherine Proctor's Blog from Here

Thank you for taking the time to view my Blog.
Hugs Diane xx


Wednesday, 16 March 2022

Week 40 Colour Creations Blog-Hop Rich Razzleberry


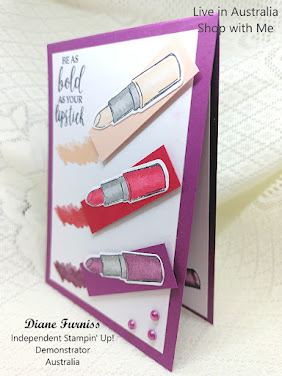
Hi Everyone and welcome to week 40 of the Colour Creations Blog-Hop. This week we are featuring Rich Razzleberry  not one of my favourite colours, but here is goes. I decided, I wanted to use a bundle that I haven't used in awhile. So I pulled out and dusted off "Dressed to Impress" I really had no idea what I was going to do with it, so this was my challenge. I started with a Rich Razzleberry card base and my only layer is Basic white. I stamped my sentiment using Memento ink in the left top corner. then I decided I would add small strips of card in Petal Pink, Real Red and Rich Razzleberry. I thought I would add the lipstick onto these of I stamped them and coloured them using the matching blends. I angled these onto my strips gluing them flat.
I placed these strips onto the white card and when I was happy with the position I then stamped the corresponding lipstick smudge in front of the strip. I then added this strips on dimensionals. To finish off the front of the card I coloured 3 Basic Pearls with Rich Razzleberry and  added them to the bottom right-hand corner.

My insert again was just a piece of Basic white card. I added another lipstick and smudge at the bottom in Rich Razzleberry and stamped a sentiment. I was happy with the way this card turned out and glad that I set myself a challenge. All the Items used in this project can be found in the 2021-2022 Annual Catalogue. If you would like to know more about these product or you would to purchase them please feel free to give me a Call, Email or PM so that I can help you.
Thank you for taking the time to view my blog.
 
 To catch then next person on the Hop please follow the link to-:  Kate Morgan   Here


If the next button link is not working or you’d like to see the entire list of participants go to Catherine Proctor's Blog from Here-

Hugs Diane xxx

Wednesday, 22 September 2021

Week 17 Colour Creations Blog - Hop Flirty Flamingo


Welcome to week 17 of the Colour Creations Blog-Hop. This week we are creating with Flirty Flamingo. This really isn't one of my favourite colours and I really do struggle to get any ideas with it. So I went through my tutorials and I thought this one will make a really stunning card and it did. (If I do say so myself) toot toot.

It's called a Front Fan Fold card and it's really easy to do. I also used the Sale-A-Bration DSP called Beautifully Penned. I used my blends to colour the flowers on the DSP and on the stamped images on the front of the card and then die cut out 2 flowers from the Hand Penned Bundle to place in the middle of the fan. The butterfly is from the Butterfly Brillance dies and my Basic pearl I colour Flirty Flamingo. This card will need a box to send it in as it stills up about 1/2 inch (1.3cm)  so you wouldn't want to squash it.


I stamped the inside of my card and coloured the flowers again, I allowed a large boarder around my card to really bring out the Flirty Flamingo. I didn't put a sentiment on the front of the card as I thought the inside words say it all.

All the items used in this weeks project can be found in the 2021-2022 Annual Stampin' Up! Catalogue and the August - September Sale-A-Bration Catalogue. If you would like more information on this project or the items used please give me a Call, Email or PM so that I can help you.

Thank you for taking the time to read my blog.

You can hope over the next person in the blog-: Catherine Proctor From Here

 If the next button link is not working or you’d like to see the entire list of participants go to Catherine Proctors blog Here-:

Hugs Diane xx


Monday, 12 July 2021

Heart of Christmas 2021 Blog-Hop


Hello and Welcome to the Heart of Christmas Blog-Hop for 2021. With the New Mini Catalogue coming out on the 3rd August 2021 and the Items in the Current 2021-2022 Annual Catalogue there are plenty of lovely sets and Papers to chose from. 

I have chosen to make a card from the Tidings of Christmas Suite Featured on Page 88-89 of the Annual Catalogue. I love the papers in the suite they are just beautiful. Anyway I have chosen to make a Pop Out Fancy fold card that really showcases the paper and the Star die. My Merry Christmas is from the Poinsettia Petals Stamp set on Page 92. 


I started with a Basic White Card base and added a Cherry Cobbler layer followed by the DSP I then used my layering circles to cut out a hole in the front of the card and also to make a frame from Mossy Meadow card. With my star I cut this out 3 time in white card and glued them together before cutting out another in Gold Foil and placing this over the top this really made the star stand out. I then place the Mossy Meadow background star under it so the it really Popped. I used my Cherry Cobbler blender pen to colour some basic peals for the centre of the star and the berries with the holly leave.

When you open this card the centre circle pops out inside the card and looks so pretty in Mossy Meadow followed by the DSP cut using the scalloped circle the scalloped circle and the star are both attached using dimensionals to give it more depth.


Once you pull back the inside flap it reveals the inside message and your place to write your own message. This is my 1st Christmas card for the season. So I hope like it as much as I do. All the product used in this project can be found in the 2021-2022 Annual Catalogue. If you would like to purchase any or all of these product please give me a Call, Email or PM so that I might help you with your Purchase.

Thank you for taking the time to read my blog, I look forward to seeing you here again.

The next person on this blog can be accessed from the button below.


“If the next button link is not working or you’d like to see the entire list of participants go to Tina Gillespie's Blog Here-:

Hugs Diane


Wednesday, 23 June 2021

Week 4 - Colour Creations Blog Hop - Bermuda Bay


Hello and welcome to week 4 of the Art with Heart Team Colour Creations Blop Hop. This week our colour is Bermuda Bay. A beautiful rich colour, but I did have a few problems designing a card for this week as I had a real mental blank. But I made it through in the end.

My card this week was stamping tone on tone, I stamped it several times using the Stamparatus. I used the lovely Butterfly Brilliance Stamp set to stamp the butterflies and then using the Heat and Stick powder and Versa Mark I stamped the butterflies again. I then added the gilded Leafing to add that touch of gold to the card. I then cut the stamped panel into 3 even pieces and attached them to a Basic White layer with dimensionals before attaching them to the front of the card. I stamped my sentiment and flagged one end. I glued the sentiment to the front of the card. I added Basic Pearls that I coloured to finish off the front of the card.


My insert I stamped just along the left-hand edge with the Butterfly Brilliance stamp and then my message stamp to finish off from the Peaceful Moments stamp set.


All items used in this project can be found in the 2021-2022 Annual Stampin' Up! Catalogue. If you Live in Australia and would like to purchase any or all of these product please give me a Call, Email or PM so that I can help you with your purchase.

Thank you for taking the time to view my blog.

 
   You can hop over to the next person in the Blog Hop-:  Theresa Gerrard       From Here


Michele Taylor

Kate Morgan

Sharon Davern

Ros Davidson

Catherine Proctor

Kristine D'Auria

Rachel Palmieri

Christine Blain

Rachel Woollard

Diane Furniss - You Are Here

Theresa Gerrard

Caroline Manwaring

Rosa Leyden

Tina Gillespie

Vicki Boucher

Andrea Sargent 


Hugs Diane xx

Wednesday, 17 February 2021

Week 36 - Colour Creations Showcase - Poppy Parade


Hello and Welcome to week 36 of the Colour Creations Showcase by the Art with Heart Team Australia.

This week our colour is Poppy Parade and very bright Red and part of the Brights Collection of Colours. I have chosen a fairly simple card for this week and yet it's a card that a beginner through to advance crafter could make. I call it an Abstract Card.


I made this style of card when my mum was up a few weeks ago as she needed a Male card and wanted something a little different. So I know this can look just as good as a male card as well as this female version.  I started out with a Blushing Bride card blank and add the Poppy Parade layer followed by another Blushing Bride. My DSP is from the Flowers for Every Season set and I layered that onto the Poppy Parade. After find the best angle I then stamped my Sentiment Using the Peaceful Moments Stamp Set and added some basic pearls to Finish off the front of the card.


My insert is very plain with just the Poppy Parade layered onto white card. all my Stamping was done in Poppy Parade. I love the simplicity of this card and yet it can look so stunning. All the products used in this project can be found in the 2020-2021 Annual Catalogue. If you would like to purchase any of all of the product used here please give me a Call, Email or PM so that I might help you with your Purchase. You can catch up with all the other lovely Poppy Parade Projects from Catherine's Page Here:-

Thank you for taking the time to view my Blog.
Hugs Diane
 
Items used in this Project:-
  • 121694          A4 Poppy Parade Card Stock
  • 131287          A4 Blushing Bride Card Stock
  • 106549          A4 Whisper White Card Stock
  • 147050          Poppy Parade Ink
  • 152486          Flowers for Every Season Designer Series Paper
  • 144219          Pearl Basic Jewels
  • 151595          Peaceful Moments stamp Set

Tuesday, 4 September 2018

Colour Creations - Crushed Curry

http://whatcathymade.com.au/awh-colour-creations-blog-hop-week-14-crushed-curry/
Hi Everyone, well here we are at week 14 of the Colour Creations Hop and the colour is "Crushed Curry" it's a very rich yellow colour, I not a person that uses a lot of yellow so I found this week a bit of a challenge for me.
So this is my card I used a very vanilla card base and top layer, but placed my crushed curry between the to layers up on dimensionals. I stamped my image from the "Accented Blooms" stamp set on the top layer and coloured in the flowers using my marker pens. I stamped the "Hello" greeting in crushed curry ink and place this up on dimensionals as well.
I used the very vanilla & copper ribbon from the Tea Room Ribbon combo pack because the ribbon is narrow I used 2 strips and the added a bow between them along with the "Share what you Love Artisan Pearls" I also added some pearls to the sentiment and some of the flowers.
I layered my inserts in the same manner as the front of the card and stamped the small flower top and bottom before addinf my sentiment. All items used for this project are in the current 2018-2019 Annual Catalogue, if you would like to purchase any or all of these items please give me a call all my details can be found on the blog.
To see what everyone else as made for this week why not hop over to Catherine's Page and have a look.

Tuesday, 21 August 2018

Colour Creations - Coastal Cabana

http://whatcathymade.com.au/awh-colour-creations-blog-hop-week-12-coastal-cabana/
Hi Everyone, Week 12 here, and the colour this week is Coastal Cabana, Love, Love, Love this colour. My card this week uses the "Time for Tea" Bundle and "Tearoom" D.S.P.

I also used the Coloured Doilies and "Label me Pretty" Stamp Set and coordinating punch. I stamped tone on tone for the teacup and label so that it would match the D.S.P. and cut the teacup and flowers using the big shot.
I mounted the doily and teacup with dimensionals before placing them on the front of the card. I did the same for the sentiment tag as well. I then added Basic pearls to finish off the front of the card.
I added an insert to the inside of the card but left this blank until I need to use the card. I must admit that I didn't purchase the coloured doilies I pinched one of Mum's but they are on list of must haves.
All of the items used in this project can be found in the current 2018-2019 Annual Catalogue, if you would like to purchase any or all of these items please give me a call, so that I can help you.
To see more project in Coastal Cabana please go to Catherine's Page Here

Tuesday, 7 August 2018

Colour Creations - Calypso Coral

http://whatcathymade.com.au/awh-colour-creations-blog-hop-week-10-calypso-coral/
Hi Everyone, We are now up to week 10 of the Colour Creations Blog Hop. This week the colour is "Calypso Coral" Mmm not sure how you would describe this colour, sort of a deep peach is my guess. My card this week is rather spiffy as my mum said. It's a really big card and I had to make a box for it to fit into as you can see in the Photo.
It's not my own idea I saw it online. But I thought it was rather nice for a change. The card measures 5 7/8 x 5 7/8 square and as the bow tabs hang over the edge of the card the box is slightly larger.  I used Calypso Coral Card stock as well as Very Vanilla and Gold Foil Sheet. The D.S.P. is from the Tea Room Collection and the Stamp set is the beautiful you set.
I used my layering ovals Dies to make the bows and then curled them around on to themselves and layered them on top of each other. I Stamped the lady twice once on the Very Vanilla card and once on the D.S.P. and cut out the dress and hat before gluing them over the stamped image.
I also stamped her again on the insert. I was really pleased with the result of this card and I am thinking of making another one in a Christmas Theme.
I then made the box using the calypso Coral card for the lid along with the same D.S.P. and the base I made from the Very Vanilla. I also made another bow and attached a Tag using the Ribbon from the Tea Times Suite, before finishing off with some basic pearls.
 
You will find all the items used for this project in the 2018 - 2019 Annual Catalogue. If you would like to purchased any or all of these items please give me a call, I would love to help you.
You can catch up with all the other blogs by going to Catherine's Page Here

Tuesday, 17 July 2018

Colour Creations - Blushing Bride

http://whatcathymade.com.au/awh-colour-creations-blog-hop-week-7-blushing-bride/
Hi Everyone, Wow week 7 and the colour this week is Blushing Bride, a beautiful pink colour. I'm sure every girl (Big or Small) will love this pretty pink on their card. I have created a Wedding Card (not that I know anyone getting married) but I just love this stamp set and had to make a it.


This is a Upright Diamond Card: I used Smoky Slate for my base card and the Blushing Bride for the layers which I stamped using the Blushing Bride Ink (Tone on Tone). I stamped the flowers from the Time for Tea Stamp Set. I then layered them onto the card. I stamped my insert using the Wonderful Moments stamp set.
  
Before layering it onto some more Blushing Bride and gluing it into place. I then stamped the bride image again on some more whisper white and using the layering ovals I cut out the image for the front of the card. I layered this onto a larger scalloped oval using foil sheet.

I then glued the stamped oval onto the foil oval before adding dimensionals and placing this on the diamond front panel of the card. I finished off by just adding a small amount of colour to the bride, colouring her flowers and  ribbon on her dress with my Blushing Bride Marker. I topped off the card by adding a few basic pearls to the front image.

All of these items can be found in the current 2018 - 2019 Annual Catalogue, if you would like to purchase any or all of these items please call or email me.
Thank you Hugs Diane
To view more of the Blushing Bride Hop got to Catherine's Page.

Tuesday, 26 June 2018

Colour Creation - Berry Burst

 http://whatcathymade.com.au/awh-colour-creations-blog-hop-week-4-berry-burst/
Wow Week 4 Berry Burst, what a lovely colour part of the 2017-2019 In Colours set.
I have made a card and small box using this colour, along with using the Eastern Beauty Stamp set and Eastern Medallions Thinlits.
Using Whisper white for my main card and Berry Burst for the front  I cut out the medallion using the Eastern Medallion Thinlits and I framed the medallion but cutting out the scalloped layering circles and the normal layering circles for make a frame for the front of the card. I embellished the card using Berry Burst Metallic edge ribbon and basic pearls.

  I stamped the sentiment from the Picture Perfect Birthday Stamp set the used the 11/2 circle punch and mounted it on dimensionals and place in the centre of the medallion.
To see more from this week colour creation go back the Catherine's Blog.