Showing posts with label Basic Rhinestones. Show all posts

Wednesday, 25 January 2023

Week 37 Colour Creations Blog-Hop - Petal Pink


Hello and welcome to week 37 of the Colour Creations Blog-Hop. This week we will be featuring Petal Pink. Not one of my favourite colours and yet I love pink in general. I thought I would hunt out an old fancy fold that I haven't made in awhile and use some of my Sale-A-Brations DSP so this is the card I came up with.

 This is called a Diamond Spring Card and will lay flat and fit into a 14cm (5 1/2 inches) square envelope. I started with a Petal Pink card base and added a Basic White layer and then the DSP called Dandy Designs. I also used the Sending Smiles bundle from the 2022-2023 Annual Catalogue and Cut out the Sending (word) I then stamped and cut out the flowers. 

 Then using the Banners Pick A Punch I cut out and layered my sentiment tag. Finishing off the front of my card with some Basic Rhinestones.

This card doesn't have an inside so I put my writing panel on the base. I stamped this from the same Sending Smiles stamp set add a couple of flowers. Very plain but it says it all.

 All the items used in this project can be found in the 2022-2023 Annual Stampin' Up! Catalogue and the 2023 Sale-A-Bration catalogue. If you would like to know more about these product or my card design please feel free to give me Call, Email or PM so that I can help you.

To catch up with the next person on the Hop please follow the link button below to-: Catherine Proctor


If the next button link is not working or you’d like to see the entire list of participants go to Catherine Proctor's Blog from Here

Thank you for taking the time to view my Blog.
Hugs Diane xx

Wednesday, 3 August 2022

Week 14 Colour Creations Blog-Hop - Coastal Cabana


Hi there and welcome to week 14 of the Art with Heart Colour Creations Blog-Hop. This week our feature colour is Coastal Cabana, this is from the Brights Collection. A lovely Turquoise colour and I love it. I decided to team it up with Bermuda Bay, as I think these two colours go together really well. So I started with a Bermuda Bay card base and added the Coastal Cabana layer I stamped this layer using the Happiness Abounds stamp set just to give the outline of the flowers. I them added 3 scalloped circle layers using the layering circles dies before adding one of the flowers from the matching DSP. I stamped my sentiment from the same stamp set and used the Stylish Shapes dies. Finishing off the front with some Basic rhinestones.


 I curled the flower and added the leaves using dimensionals. I painted the whole flower using Wink of Stella.


My insert was a layer of Coastal Cabana and Basic White card Stamping the flower outline again to match the front of the card and a simple Best Wishes. All the items used in this project can be found in the 2022-2023 Annual Catalogue. If you would like more information on these products please feel free to give me a call, email or PM so that I can help you.

To catch up with the next person on the Hop please follow the link button below to-:Christine Blain


If the next button link is not working or you’d like to see the entire list of participants go to Catherine Proctor's Blog from Here

Thank you for taking the time to view my Blog.
Hugs Diane xx


Wednesday, 20 April 2022

Week 45 Colour Creations Blog-Hop - Soft Sea Foam


Wow can you believe we are almost at the end of the colours? only one more to go. This week though we have Soft Sea Foam a very very pale green and very pretty as that. Soft Sea Foam is part of the Subtles Collection. I have chosen to make a Mother's day card as Mother's Day is the 8th May here in Australia. I am using the beautiful Pansy Petals DSP for this card.


This is the card that I made. I Started with Soft Sea Foam for the base that I cut into a 6 x 6 inch square an formed an envelope shape. I then cut out the flowers and leaves from the DSP and arranged them onto the front of the card. I added some Silver Foil leaves from the Forever Fern dies and the Happy Mother's day came from the Timeless Tulips stamp set. Finishing off the front of the card with some Basic Rhinestones.

As I wanted my card to sand on it's own I added a small card to the back of the envelope so that it would stand.

I just placed a piece of Basic White card to the inside so that I could write a message to mum. This is such a lovely colour to work with and the Pansies go really well with Soft Sea Foam. I know my Mum will love this card.

All the items used in this project and in the 2021-2022 Annual Catalogue, that ends on the 2nd May 2022 so after this day the DSP will no longer be available. I'm please to say that the Pansy Patch Stamp set and dies will still be available in the new 2022-2023 Annual Catalogue that goes live on the 3rd May 2022. If you wish to purchase any or all of these items please feel free to give me a call, email or PM so that I can help you with your purchase.

You can catch the next person in the Blog-Hop    Christine Blain   Here-:


If the next button link is not working or you’d like to see the entire list of participants go to Catherine Proctor's Blog from Here

Thank you for taking the time to view my Blog.
Hugs Diane xx


Wednesday, 5 January 2022

Week 30 - Colour Creations Blog-Hop Mossy Meadow


Hello Everyone and Happy New Year to you all. We are back to carry on with out colour creations Blog-Hop this year and at week 30 we have Mossy Meadow for you all. I have chosen to CASE a card from the Annual Catalogue (with my own twist) and I'm really pleased with how it turned out.


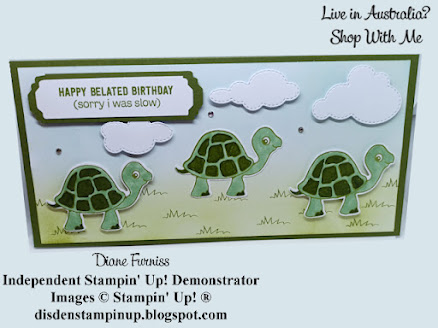
It's a DL size card and I used the Turtle Friends Bundle, I Started with a Mossy Meadow card base and then added a Basic white layer that I first coloured with garden green and Balmy blue ink using the Blending brushes. I then stamped the grass using Mossy Meadow. I stamped my turtles in Momento Ink and then used my Blends in Mossy Meadow to colour the turtles Mossy meadow light and the Dark for the shell. I then punched them out using the Turtle Punch. I then cut out the clouds from the Give it a Whirl die set before adding my sentiment in the top left corner. I then glued the middle turtle flat and put the other 2 up on dimensionals. I finished off the front with basic rhinestones. So Cute.


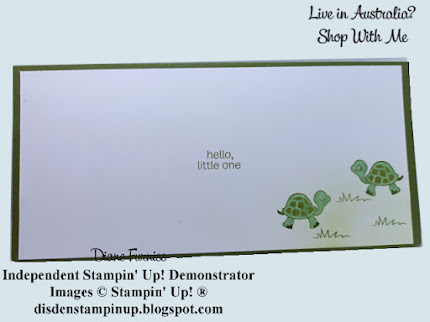
The inside of the card is plain but I thought I would add the smaller turtles to the corner as a point of interest I coloured these in the same colours as the turtles on the front of the card. I know I have someone to give this card to already as they are stuck in New Zealand at the moment and wont be home in time for their birthday on the 3rd of January. They were suppose to be home on the 8th October 2021 but have been unable to get direct flights back to South Australia and with a small Baby they need to get back here, At least they have family over there to stay with until such time. Thank goodness for little mercies.
All the items used in this project can be found in the 2021-2022 Annual Stampin' Up! Catalogue. If you would like to purchase any or all of these projects please give me a call, Email or PM me so that I can help you with your purchase.

Thank you for taking the time to read my blog. To catch then next person on the Hop please follow the link to-:  Rosa Leyden Here.
 

  If the next button link is not working or you’d like to see the entire list of participants go to Catherine Proctor's Blog from Here-:

Thank you again Hugs Diane xx

Wednesday, 15 December 2021

Week 29 - Colour Creations Blog-Hop - Misty Moonlight

Hello Everyone, and welcome to the last Colour Creations Blog-Hop for 2021. No this isn't the end of our Colour Creations Blog-Hop we will be back on the 5th January 2022 with the next colour.
But for this week we are doing Misty Moonlight as our colour. This in one of the 2020-2022 In Colors and a very pretty dusty blue. 
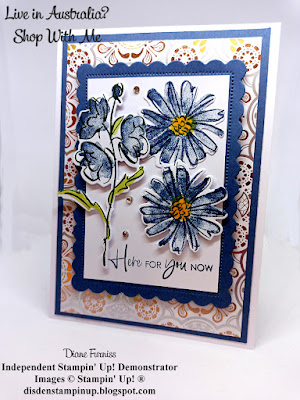
I have chosen to do mine using all products from the 2021-2022 Annual Catalogue.  So I have started with a Basic White card Base and added a Misty Moonlight Layer, then a DSP layer from the Simply Elegant specialty paper pack. I then used the Color & Contour Bundle for my Scalloped layer and topped it with more Basic White. I used the same stamp set and stamped my flowers using Misty Moonlight Ink and finished off the front with some Basic Rhinestones.


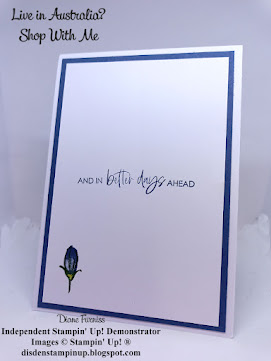
I didn't know how the flowers were going to look stamped in Misty Moonlight but the surprisingly look nice to me. My insert as always is very simple with just a Misty Moonlight layer with a Basic White layer over the top and Stamped in Misty Moonlight. I popped  a small bud in the bottom left-hand corner just to take the plainness out of it.


I originally I had done this card in Melon Mambo. But as I was away when that colour came up I decided to see what it would look like in the Misty Moonlight as I like it. All the products used in this weeks project can be found in the 2021-2022 Annual Stampin' Up! Catalogue. If you would like to purchase any or all of these products please feel free to give me a call, PM or email so that I can help you with your purchase.

Thank you for taking the time to read my blog. To catch then next person on the Hop please follow the link to-: Christine Blain Here.


 If the next button link is not working or you’d like to see the entire list of participants go to Catherine Proctor's Blog from Here-:
 
Thank you once again for taking the time to view my Blog. 
Wishing you all a Very Merry Christmas and Safe New Year. We will be back on 5th January 2022 with Mossy Meadow.
Look forward to seeing you all then.
Hugs Diane xx


Wednesday, 8 December 2021

Week 28 - Colour Creations Blog-Hop - Mint Macaron


Hi Everyone, and welcome to week 28 of the Art with Heart Colour Creations Blog-Hop. This week our colour is Mint Macaron, this colour is part of the Subtles collection and a beautiful dusty green.
I have chosen to make a card design that I haven't done in a while, it's simple and very plain but I like it. I started with a Mint Macaron card Base and added a Basic white layer before adding my DSP from the Expressions in Ink paper pack. I love this pack as they are beautiful swirls and whirls that make it so easy to use for any occasion. 
 

 I also used the Color and Contour Bundle to stamp my flowers and cut them out. I stamped the outline in Garden Green and then the fill colour was Mint Macaron on Mint Macaron card stock. I added 2 circles and Happy Birthday to finish off the front of this very plain card. As this card fold in the centre it's not wise to put to much on the pop up piece as it wont slide through the slit in the middle of the card.


 The back of the card has a lovely writing panel so you have a space to write your message. I have also kept this very plain as well. Sometimes it's just nice to have a plain card.  All the items used in this project can be found in the 2021-2022 Annual Catalogue. If you would like to purchase these item please give me a Call, PM or email so that I can help you with your purchase.

Thank you for taking the time to read my blog. To catch then next person on the Hop please follow the link to-:   Theresa Gerrard Here
 

 If the next button link is not working or you’d like to see the entire list of participants go to Christine Blain's Blog from here-:

Thank you again.
Bye for now.
Diane Furniss 

Wednesday, 30 September 2020

Week 18 - Colour Creations Showcase - Gorgeous Grape

 Week 18 Gorgeous Grape

Hi Everyone, and welcome to week 18 of the Art with Heart Team Colour Creations Showcase. 

This week our Colour is Gorgeous Grape this is  part of the Brights Collection of colours and a lovely dark Purple. I have chosen to team mine up with Purple Posy this is one of the 2019 - 2021 In-colors and I think they look very nice together. All my Stamping is using the Gorgeous Grape ink.

I started out with a Purple Posy Card base and add the Gorgeous Grape layer and then another Purple Posy layer I also add yet another layer in the Gorgeous Grape along with Whisper White. I stamped my Poppies using the Gorgeous Grape ink and the Painted Poppies Stamp set. I used the smudgy stamp to stamp the colour of the poppies by stamping off once and then onto the images. I stamped my sentiment from the Peaceful Moments set and once again I stamped in Gorgeous Grape. I then cut this out using the die from the So Sentimental bundle. I coloured around the edge of the die cut sentiment using the Dark Highland Heather Blend pen. I also coloured some gems using the blend pen and attached the tag using dimensionals.


My insert was layered using the Gorgeous Grape and Purple Posy and again stamped in Gorgeous Grape. I kept the insert fairly simple and I was happy with the result.

All the items used in this project can be found in the 2020 -2021 Annual Catalogue. If you would like to purchase any or all of these product please give me a call, Email or PM me and I will help you with your purchase.

To catch all the other lovely projects in this weeks Colour Creations Showcase please head over to Catherine Page Here-:

Thank you for visiting my Blog I look forwards to seeing you here again. Please leave a comment as I love to here what you think of these projects.

Hugs Diane xxx

Products used in this project-:

147011          A4 Gorgeous Grape Card Stock
150887          A4 Purple Posy Card Stock
106549          A4 Whisper White Card Stock
147099          Gorgeous Grape Classic Ink Pad
154887          Highland Heather Dark Blends Pen
144220          Rhinestone Basic Jewels
151599          Painted Poppies Stamp Set
151595          Peaceful Moments Stamp Set
151690          Stitched So Sweetly Dies
104430          Stampin' Dimensionals


Tuesday, 2 July 2019

Colour Creations - Purple Posy

http://whatcathymade.com.au/art-with-heart-colour-creations-blog-hop-week-55-purple-posy/

Hi Everyone, well we are at the end of our Colour Creations Blog-Hop this is very sad as I have really enjoyed the challenge of using every colour that Stampin' Up! have in there range.
And with that said we are using the Purple Posy to finish on. What a beautiful colour it is as pale and delicate. As I don't have a lot of products in this colour only card and ribbon I had a bit of a challenge to make this card but I'm very happy with the result.

 I started out with a Gorgeous Grape card base and add then Highland Heather as the 1st layer and stamped tone on tone using the Floral Essence Stamp set. I coloured the centres of the flowers with my Daffodil Delight Blender pen just to make them show up better I then place another layer of card using the Purple Posy over this and add the ribbon at the join mark. I then stamped the flower from the Floral Essence onto another strip of Purple Posy in Versa Mark and Gold Embossed before cutting them into squares again I coloured the centres of the flowers with my blender pen before using both Gorgeous Grape and Highland Heather to Aqua paint the rest of the flowers to give them some depth, I mounted them on to Gorgeous Grape square and added dimensionals to the back. To finish off the front I stamped Happy Birthday from the Wonderful Moments Stamp set and flagged the end and glued this under the bow, I added some basic rhinestones to the ribbon and wink of stella to the mount flowers.

Carrying the theme to the inside of the card I stamped the flowers again and Gold Embossed them as well as Aqua painted them I them mounted the Purple Posy on to Highland Heather to match the outside of the card.
All the products used in this project are available in the 2019-2020 Annual Catalogue, if you would like to purchase all or any of the project used here please give me a Call, Email or PM so that I can help you with your purchase.
To catch up with the rest of the Purple Posy Blog-Hoppers please head over to Catherine's Page Here:-
This may be the last of the Colour Creations Blog but keep popping by as there will be plenty of new posts and Blog-Hops come soon.
Bye for Now........
Hugs Diane xxx

Saturday, 16 June 2018

Elegant Butterfly Card

Main Card                 8 ¼ x 5 7/8 Inches Scored at 4 1/8 inches on the long side.
Card Mat                   5 5/8 x 3 7/8 Inches
                   White      5 3/8 x 3 5/8 inches
Panel                          4 ¼ x 2 inches
Panel D.S.P.              4 1/8 x 1 7/8 inches
Tag Mat                     2 ½ x 1 ¼ inches
       White                  2 3/8 x 1 1/8 inches
Springtime Impressions Butterfly Die Cut
3 Rhinestones
Score card at 4 1/8 inches on the long side.
Glue the Mat to the card front and then the white mat on top.
Glue the D.S.P. to the Mat panel and then to the card front.
Stamp your sentiment on the white tag and mat onto the Mat tag.
Use foam pads to attach to the front of the card.
Place foam pads to the back of the butterfly and attach to the card front.
Place rhinestone down the spine of the butterfly.
Tutorial and all measurements by Diane Furniss
16th June 2018