Showing posts with label Layering Circles framelits. Show all posts

Monday, 12 July 2021

Heart of Christmas 2021 Blog-Hop


Hello and Welcome to the Heart of Christmas Blog-Hop for 2021. With the New Mini Catalogue coming out on the 3rd August 2021 and the Items in the Current 2021-2022 Annual Catalogue there are plenty of lovely sets and Papers to chose from. 

I have chosen to make a card from the Tidings of Christmas Suite Featured on Page 88-89 of the Annual Catalogue. I love the papers in the suite they are just beautiful. Anyway I have chosen to make a Pop Out Fancy fold card that really showcases the paper and the Star die. My Merry Christmas is from the Poinsettia Petals Stamp set on Page 92. 


I started with a Basic White Card base and added a Cherry Cobbler layer followed by the DSP I then used my layering circles to cut out a hole in the front of the card and also to make a frame from Mossy Meadow card. With my star I cut this out 3 time in white card and glued them together before cutting out another in Gold Foil and placing this over the top this really made the star stand out. I then place the Mossy Meadow background star under it so the it really Popped. I used my Cherry Cobbler blender pen to colour some basic peals for the centre of the star and the berries with the holly leave.

When you open this card the centre circle pops out inside the card and looks so pretty in Mossy Meadow followed by the DSP cut using the scalloped circle the scalloped circle and the star are both attached using dimensionals to give it more depth.


Once you pull back the inside flap it reveals the inside message and your place to write your own message. This is my 1st Christmas card for the season. So I hope like it as much as I do. All the product used in this project can be found in the 2021-2022 Annual Catalogue. If you would like to purchase any or all of these product please give me a Call, Email or PM so that I might help you with your Purchase.

Thank you for taking the time to read my blog, I look forward to seeing you here again.

The next person on this blog can be accessed from the button below.


“If the next button link is not working or you’d like to see the entire list of participants go to Tina Gillespie's Blog Here-:

Hugs Diane


Wednesday, 16 June 2021

Week 3 - Colour Creations Blog Hop - Basic Gray

Hello Everyone and welcome to week 3 of the Art with Heart Colour Creations Blog Hop. This week our colour is Basic Gray. Very interesting colour not one I am keen on I find it a little drab for my taste. But all the same I like a challenge and so I decided I would hop along with week. 

My card is a fancy fold, I don't know what others call it but I call it a Butterfly wings style card as you can see by the photo.

It's a 51/2 inch square card. So I started with a Basic Gray base and added my layers using the Gold Foil Sheet and then the Simply Elegant DSP from the New Annual Catalogue. After cutting my wings and crossing them over the card I added a Square Vellum Doily then my Poppies I stamped my Happy Birthday from the same set and cut out using the Stitched So Sweetly Dies. 

I layered these onto the front of the card using dimensionals and finished off with the Silver Metallic Pearls. For my insert I also layered the Gold Foil and Simply Elegant DSP before added the largest of the layering circles for my writing panel in both scalloped and plain, I stamped my sentiment and some more poppies that I coloured using my Write Marker pens. All of my Stamping was done in Basic Gray ink so that it blended.

All of the Items used in this project can be found in the 2021-2022 Annual Catalogue. If you would like to purchase any or all of the items used please give me a Call, Email or PM so that I can help you with your purchase. 

Thank you for  taking the time to view my Blog.

  You can hop over to the next person in the Blog Hop-: Claire Daly   From Here

 If you have a broken link or have come to this blog hop midway, you can view all the participants below:


Michele Taylor 

Kate Morgan

Sharon Davern

Ros Davidson

Catherine Proctor

Rachel Palmieri

Theresa Gerrard

Kristine D'Auria

Tina Gillespie

Rachel Woollard

Di Furniss - You are Here

Claire Daly

Christine Blain

Fiona Ryan

Caroline Manwaring

Vicki Boucher

Andrea Sargent

 Hugs Diane xx


Wednesday, 7 April 2021

Week 43 - Terracotta Tile Colour Creations Showcase


Hello Everyone and welcome to week 43 of the colour creations showcase.  As you may have noticed we have jumped a few colours and will be going back to them from next week. This is because by the time we would have reached Terracotta Tile this colour would have retired as this is one of the 2019-2021 incolors.
It's not one of my favourite colours as I'm not a brown or rust colour person, but it sits well in the colour pallet. 
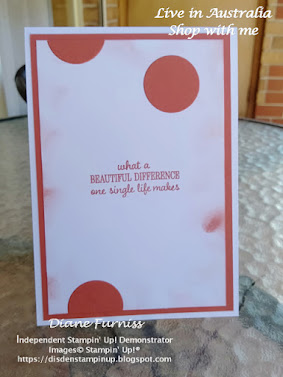
I decided I wanted to make a card outside of my comfort zone using only card and circles. This is what I came up with.
 

 I started with a white card base and added a Terracotta Tile layer I then die cut out 3 circles from the white layer and then 4 circles out of Terracotta Tile, I then cut the circles again leaving only small frame pieces. I glues the circles in an abstract fashion and then glue them to the white layer. As they looked a bit lost on there I used my Terracotta Tile ink pad and a dauber around the edges of the white layer and then coloured in the circles using Seaside Spray and Rococo Rose Blends in the light only.
I stamped my happy birthday and punched it out then punched out another in Terracotta Tile and layered behind it I then placed my white layer onto the card front using dimensionals. I think this will make a really lovely male card.
 

 My insert was layers of Terracotta Tile and then White I sued the centres of the circles to add some interest to the inside along with my sentiment and once again I used my dauber. Both the inside and front sentiments are from the Timeless Tulips set. I'm happy to say that this stamp set and the punch are carrying over into the New Annual catalogue that will go live on the 4th May 2021. Just remember that the Terracotta Tile colour will not be in the New Annual Catalogue.
If you would like more information on this card and the products used please give me a call, email or PM me so that I can help you.
To catch all the other projects using this colour please head over to Catherine's Page Here-:
Thank you for taking the time to read my blog.
Hugs Diane xxxx


Monday, 16 November 2020

Heart of Christmas November 2020


Hello and Welcome to the final Heart of Christmas 2020 Blog Hop. We have seen some really beautiful projects and lots of inspiration from all who have participated, thank you.
This week I have a project that I really enjoyed making I used the Hammered Metal Embossing fold and the Ornate Thanks edge die along with the Poinsettia petal bundle. I must say I was pleased with the results. I really only used 2 colours Very Vanilla and Garden Green and I stamped using Soft Suede. 
 
 
I used the Poinsettia Place DSP for my 3 circles and the small die from the Poinsettia Petals bundle. I mounted my 3 circles using dimensionals. This was such a simple design and yet it says it all. (or at least I think it does) I kept my insert very plain by layering with a Garden Green and Very Vanilla layer.
 

 I used the holly leaves from the Peace & Joy stamp set just to give a little more. All the items used in this project can be found in the August - December 2020 Mini Catalogue and the 2020-2021 Annual Catalogue, If you would like to purchase any or all of the products used in this project please give me a Call, Email or PM so that I might help you. To catch all the other lovely project in this years Final Heart of Christmas 2020 Blog Hop please head over to Judy May's Blog Here-:
Thank you for taking the time to read my Blog. I wish you all a very Merry Christmas and New Year, please stay safe. I look forward to seeing you all in 2021 
Hugs Diane xxx

Items used in this project-:
  1. 153487          Poinsettia Place Designer Series Paper
  2. 155148          Poinsettia Petals Bundle
  3. 153430          Peace & Joy Stamp Set
  4. 141705          Layer Circles Dies
  5. 150646          Hammered Metal 3D Embossing Folder
  6. 154115          Ornate Thanks Bundle
  7. 106550          A4 Very Vanilla Card Stock
  8. 108605          A4 Garden Green Card Stock
  9. 147115          Soft Suede Ink Pad
  10. 104430          Stampin' Dimensionals


Wednesday, 11 November 2020

Week 24 - Colour Creations Showcase - Mango Melody

 Week 24 Mango Melody

Hello and welcome to week 24 of the Art with Heart Colour Creations Showcase. This week our colour is Mango Melody and really rich orangey yellow I love it. You will find this colour as part of the Brights Collections it's comes in A4 Card stock, Classic Ink Pad and Refill, along with Blends combo Pens and DSP. 
I have chosen to use the Daisy Lane stamp set for my card and I made my own DSP.

I started my project with a Mango Melody card base and added a whisper white layer before using the Ornate Floral 3D embossing folder on the Mango Melody layer. I then cut out the edging in So Saffron to place either side of my middle panel. I then sponged the whole panel in So Saffron so that is wasn't so brightly white. Then using the dies from the Ornate Thanks Bundle. I placed this panel onto dimensionals and added a scalloped and plain circle to the centre. I then added 2  rectangles over the top to add some interest, and stamped Lets Celebrate you from the Celebrate Sunflowers stamp set.
 

My insert was very basic I added a Whisper white layer to stamp my sentiment onto. The stamp set used here is the So Sentimental set as I really love the set and use it a lot.
All the items used in this project can be found in the current 2020-2021 Annual Stampin' Up! Catalogue, if you would like to purchase these items please give me a call, email or PM so that I might help you with your purchase.
To catch all the other lovely projects in this weeks colour creations showcase please head over to Catherine's Page here-:
Thank you for viewing my blog
Hugs Diane xx
 
Items used in this project-:
    1.      So Sentimental Stamp Set            151691
    2.      Celebrate Sunflowers                   152517
    3.      Daisy Lane Stamp Set                  149325
    4.      A4 Mango Melody Card              147013
    5.      Mango Melody Ink Pad               147093
    6.      A4 So Saffron Card                      108611 
    7.      A4 Whisper White Card               106549
    8.      Dimensionals                                104430
    9.      Ornate Boarders dies                    152724
    10.      Ornate Floral 3D Emboss Folder 152725
    11.      Memento Ink Pad                         132708
    12.      Stamping Sponges                        141337
    13.      Layering Circles                           151770
    14.      Stitched Rectangles                      151820


Sunday, 4 October 2020

#40 Ninja Turtle Card, Using Stampin' Up! Products.

Hi Everyone,

Here is a lovely project for the Young one or Young at heart. I really did enjoy making this card and it's so easy. If you would like the Written Tutorial for this Card Please head over to my Facebook Group Page-: Di's Den For Stamping Crafting and Tutorials

It's Free you just have to ask to join.

Look forward to seeing you there.

Hugs Diane xxx

Wednesday, 20 November 2019

Heart of Christmas - Week 14

http://bit.ly/35dVJ1N
Hi Everyone, Here we are again with another Christmas project for you all. I must say I am loving all the lovely projects this year, it is very hard to choose a favourite each week. That's great news as it means they are all as good as each other.
This week I have another gifting card, I have seen this done but when I tried it, it was too small :(
So I set about changing this to fit Australian sizes.
Here is my Project-: It's a Cake in a Cup Pouch (with a stand on the back)


I found the packets for the cake in a cup in the local supermarket and I also found the Eco Spoons (Made from Bamboo) there as well. But as I said when I set about making one from measurements I had found online, my cake packet wouldn't fit. So this is my version. I have used the lovely Cup of Christmas Bundle from the 2019 Holiday Catalogue along with the Snowflakes from the Free Skate Bundle then I used my layering circles for my sentiment and some ribbon to finish off the front of the pouches.
But where to write your message I hear you ask. Well I thought of that and came up with this idea.


A writing panel on the back. As you know, as I have said before I hate cards that don't stand on their own. So I have made a stand for the back of the pouch so that it will stand up even with the weight of the packet and spoon. I will have to make a box for this to go into as it wont fit into an envelope, but I was so please with the way they turned out.
All the items used in this project can be found in the 2019 Stampin' Up! Holiday Catalogue. But be quick as time is running out the catalogue ends on the 2nd January 2020.
If you would like to purchase all or any of the items used in this project (Except the Cake packet and spoon) Please give me a call, email or PM so that I can help you.
Now head over to Sharon's Page here-: to catch up with the other project in this weeks hop.
Bye for now, Hugs Diane xxx

Wednesday, 24 October 2018

Heart of Christmas - Week 11

https://clairedaly.typepad.com/sisterhood_of_the_travell/2018/10/heart-of-christmas-week-11-christmas-creations-bought-to-you-by-the-art-with-heart-stampin-up-team.html

Well Hello Everyone!

Wow Week 11 of the Heart of Christmas Blog-Hop and only 9 weeks until Christmas. If you haven't started your Christmas Cards and Shopping yet I think you might want to get cracking soon.
This week I make my card in Gray Granite and I love the way it turned out. I have has a really good week, this week with the creative juices really running well. (or at least I think so)........lol


I used Granite Gray for my base and Basic Gray for the layer before adding copper foil sheet that I embossed using the Subtle Embossing folder and then the Joyous Noel DSP.
The 2 stamp set used were Peaceful Noel and Making Christmas Bright. I stamped the branches from the Peaceful Noel and added Metallic Pearls to the ends so that it match in with the DSP.


After using the layering circles for the sentiment I attached them using dimensional to the front of the card.


I stamped my insert using Tranquil Tide and Merry Merlot ink to give a real Christmas feel to the insert.
All the items used in the project can be found in the 2018-2019 Annual catalogue and the 2018 Holiday Catalogue. If you would like to purchase these items please give me a call or email so that I might help you with your purchase.
To catch all the other Heart of Christmas week 11 Bloggers please go to Claire's Page Here
Thanks for stopping by.
Hugs Diane  xxx

Wednesday, 17 October 2018

Heart of Christmas - Week 10

http://clairedaly.typepad.com/sisterhood_of_the_travell/2018/10/heart-of-christmas-week-10-christmas-creations-bought-to-you-by-the-art-with-heart-stampin-up-team.html 

Hi Everyone, Here we are at week 10 of the Heart of Christmas Blog-Hop for 2018. I can't believe we have already made 9 other Christmas items already and there is only 10 week until Christmas. I better get cracking with my Christmas Shopping.....lol

Well this week I'm using the Dashing Deer Bundle again as I really do love this set.


I Started with a Garden Green card base and added the gold foil layer and I stamped the stars in Garden Green on the Whisper White before adding this to the front of the card also. Using my layering circles framelits I cut out a circle in the Tranquil Tide Glimmer Paper and placed this in the centre front. I then cut out the rein deer and edges from the Dashing Deer dies and glued the edges at the top of the card and mounted the deer on dimensionals over the green circle. I stamped my sentiment from the Merry Christmas All stamp set and mounted this also on dimensionals to the front of the card.

I then added a Whisper White insert and stamped in Garden Green to finish off the card. All the Items used in this project can be found in the 2018-2018 Annual Catalogue and the 2018 Holiday Catalogue, if you would like to purchase these product or others please email or call me so that I can help you with your purchase.
To catch all the other hoppers in the weeks blog please go to Claire's Page Here.
Bye for now, Stay Safe Hugs Diane xx

Tuesday, 24 July 2018

Colour Creation - Cajun Craze

http://whatcathymade.com.au/awh-colour-creations-blog-hop-week-8-cajun-craze/
Hi Everyone, we are now up to week 8 of the colour creations blog hop. This week the colour is Cajun Craze, a rusty brown colour with very rich tones. The card I have designed this week is called a Criss Cross card, but this card doesn't stand up on it's own. I don't like cards that have to balance on the side so that you can view them, so I designed a stand that is attached to the back of the card. It will lay flat in your envelope for posting.
 I used the "Rooted in Nature" Bundle and "Natures Poem" D.S.P.
I layered my Very Vanilla card onto Cajun Craze card stock of my pull out insert. I also used my layering circles to make the sentiment for the front of the card, and stamped my leaves and cut them out using the dies and big shot.
There is plenty of space on the insert so that if you would like to add a gift card as well a write you messages you can.

Here you can see the stand that I made for the back of the card so that is stands alone. All the items used to make this card are in the 2018 - 2019 Annual Catalogue, if you would like to purchase any or all of these items please give me a call I would love to help you. Don't forget there is still time to join my team with the great July special. I will be posting a tutorial for this card in early August on my Facebook group. "Di's Den for Stamping Crafting and Tutorials" so keep a look out for it.
Hugs Diane
To view more of the Cajun Craze Blog Hop go to Catherine's Page Here.

Tuesday, 10 July 2018

Colour Creations - Blueberry Bushel

http://whatcathymade.com.au/awh-colour-creations-blog-hop-week-6-blueberry-bushel/ 
Hi Everyone, this is week 6 of the Blog Hop and this week the colour is Blueberry Bushel.  A beautiful rich blue, this colour is one of the New 2018 - 2020 In Colours. I'm sure it's going to be a winner.
My Card this week uses the Blueberry Bushel as a mat layer on a whisper white card base, followed by another mat layer of whisper white. I have then used my aqua painter and painted this layer with the Blueberry Bushel ink, giving a washed effect. I then stamped the scene from the Waterfront Stamp Set and using my layering circles I cut out the scene using my Big Shot. I also used the layering circles to make a frame to go around my scene in the same way.
I stamped my sentiment from the Rooted in Nature Stamp Set and the Birds from the High Tide Stamp Set and mounted the scene on Dimensionals and place on the front of the card.
I then stamped my insert using the Rooted in Nature Stamp Set of the branches and Sentiment. Before matting onto an Blueberry Bushel Mat and gluing into place on the inside of the card. 
All of these items can be found in the current 2018 - 2019 Annual Catalogue, if you would like to purchase any or all of these items please call or email me.
Thank you Hugs Diane
To see more of the Blueberry Blog Hop go the Catherine's Page.


Tuesday, 26 June 2018

Colour Creation - Berry Burst

 http://whatcathymade.com.au/awh-colour-creations-blog-hop-week-4-berry-burst/
Wow Week 4 Berry Burst, what a lovely colour part of the 2017-2019 In Colours set.
I have made a card and small box using this colour, along with using the Eastern Beauty Stamp set and Eastern Medallions Thinlits.
Using Whisper white for my main card and Berry Burst for the front  I cut out the medallion using the Eastern Medallion Thinlits and I framed the medallion but cutting out the scalloped layering circles and the normal layering circles for make a frame for the front of the card. I embellished the card using Berry Burst Metallic edge ribbon and basic pearls.

  I stamped the sentiment from the Picture Perfect Birthday Stamp set the used the 11/2 circle punch and mounted it on dimensionals and place in the centre of the medallion.
To see more from this week colour creation go back the Catherine's Blog.


Tuesday, 19 June 2018

Colour Creations with Bermuda Bay

http://whatcathymade.com.au/awh-colour-creations-blog-hop-week-3-bermuda-bay/
Hi This is week 3 of the colour creations Blog Hop. This week we are featuring Bermuda Bay, What a lovely rich colour one of my favourites.
Using the Bermuda Bay Card along with gold foil sheet and whisper white I created this card. I used the Big shot to cut out the Celebrate, from the Celebrate You thinlits I also cut the circles from the Layering Circles and Stitched Shapes framelits and the Butterfly from the Springtime Impressions Thinlits.
I sponged the Butterfly with the Bermuda bay ink and added Basic Pearls to the body, then mounted onto the circles using Dimensionals.
I stamped the insert using the Abstract Impressions stamp set.
Thanks for looking, Hugs Diane
To see more great designs in Bermuda Bay go back the Catherine's Page.